Monday, February 27, 2012

Garlic Potatoes / Potatoes au Gratin

This recipe is pretty basic, and can be easily tweaked to increase the portions or combine different flavors. It makes a fantastic side dish for just about any dinner.

Ingredients:

  • Yukon gold potatoes (thinly sliced) 5 medium potatoes makes enough for 4-6 servings.
  • Garlic (crushed) I used 3 cloves.
  • Heavy cream - I used 1/2 cup. 
  • Cheddar cheese (I recommend extra sharp)
  • Salt and pepper

Instructions:

  • Preheat oven to 400 F.
  • Layer sliced potatoes with crushed garlic in an ovenproof dish. 
  • Pour the cream over the potatoes. 
  • Sprinkle the top with lots of cheese.
  • Bake for 30-40 minutes, until the potatoes are cooked through and the cheese is golden brown and melted. 
Here's what it looks like when it's assembled. 

And when it comes out of the oven. Yum! 

Sunday, February 26, 2012

Roasted Tomato Soup

This recipe for Roasted Tomato Soup comes from the Food Network's Tyler Florence. It's the perfect soup to warm you up on a cold Winter day, and it's very easy to make.

Start with a variety of tomatoes, I like to use a mix of cherry, grape, roma, and heirloom.

Halve each tomato and remove the core, then place them on a baking tray along with slices of onion and whole garlic cloves. The grape tomatoes can be roasted whole. Roast for 30 minutes at 450 F. 

Here's what everything looks like after roasting.

Then, add all of the vegetables to a saucepan of chicken or vegetable stock, which has already been simmering. Add 1-2 bay leaves, and simmer for 20 minutes. 

After 20 minutes, remove the bay leaves and blend the soup. The recipe recommends adding cream to the soup, but I find that it tastes creamy enough without the cream, so I don't add any. 

Here's the finished product. It goes really well with a grilled cheese sandwich, or a Cheddar Buttermilk Biscuit

Tuesday, February 21, 2012

Buttermilk Cheddar Scones and Chocolate Chip Pecan Cookies

Scones (or biscuits) are one of my absolute favorite foods, I like all variations from sweet to savory, and this recipe for Buttermilk Cheddar Biscuits from the Barefoot Contessa makes the perfect scone for lunch or dinner. They are easy to assemble, provided you have a pastry mixer, otherwise they can be quite labor-intensive. Once you've combined all the ingredients, you have to roll-out the dough on a floured surface and then use a knife to cut the dough into eight triangle-shaped scones or biscuits. This is much easier than using a cookie cutter, as you don't have to reshape the dough in order to use it all up. I also like the rustic look of these scones better than perfectly round ones.

The recipe recommends brushing the scones with egg wash before baking, but I don't believe that's necessary. If you're really worried about presentation feel free, but I don't think it adds any flavor. 

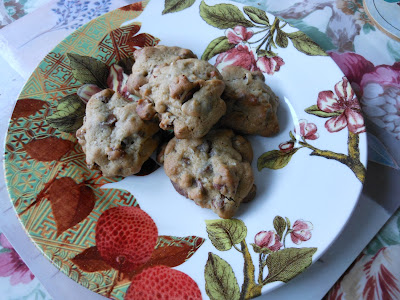
This recipe for Chocolate Chip Pecan Cookies comes from a Williams-Sonoma cookbook. 
Ingredients:
  • 1 1/4 cups all-purpose flour
  • 1/2 teaspoon baking soda
  • 1/8 teaspoon salt
  • 1/2 cup (4 oz) unsalted butter
  • 3/4 cup firmly packed brown sugar
  • 1 teaspoon vanilla extract
  • 1 egg
  • 1 1/2 cups chocolate chips (I used milk chocolate)
  • 1 1/2 cups chopped pecans
Instructions:
  • Preheat oven to 375 F.
  • In a bowl, sift together the flour, baking soda, and salt. Set aside.
  • In a large bowl, combine the butter, brown sugar, and vanilla. Using an electric mixer set on high speed, beat until light and fluffy.
  • Beat in the egg.
  • Reduce the speed to low, add the flour mixture, and mix until just incorporated. 
  • Mix in the chocolate chips and pecans until evenly distributed. 
  • Spoon rounded tablespoons of the batter onto ungreased baking sheets, spacing the cookies 2 inches apart. 
  • Bake until just firm to the touch and beginning to brown, about 15 minutes. **
  • Transfer to wire racks to cool. 
**: I left my first batch in for 15 minutes and they burned on the bottom, so I only left the second batch in the oven for about 13 minutes and they turned out better. I recommend checking the cookies after 10 minutes to avoid burning.

I used a tablespoon measure to scoop the dough and the cookies came out nicely. They're quite dense because there are a lot of chocolate chips and nuts in each cookie 

These cookies will last up to 4 days in an airtight container, if you don't finish them off before that...

Wednesday, February 15, 2012

Lemon & Blueberry Loaf and Eton Mess

Yesterday was my aunt's birthday (and Valentine's day), so I decided to bake her a birthday present. She likes lemons and blueberries, so when I came across this recipe for a "Lushious Lemon and Blueberry Loaf Cake", I thought it would be the perfect gift. It was easy to make, and turned out really well. I used frozen blueberries because my local grocery store didn't have any fresh ones in stock, and although they all sunk to the bottom of the loaf, it still tasted great.


I also made a batch of Eton Mess. After having it at my cousin's house in Ireland over Christmas, I had been meaning to re-create it at home. It's really easy to make and versatile, too. I used fresh strawberries, but you can use any fruit, or combination of fruits that you like.

All you need to make Eton Mess is whipping cream, meringues (store-bought or homemade), and the fruit of your choice. I used 1 pint of heavy whipping cream and 1 1/2 little green baskets of strawberries to make 5 servings, but there was still some leftover. After whipping the cream until it forms stiff peaks, fold in the crushed meringue (I recommend cutting the meringue into bite-sized chunks so that it doesn't just disintegrate into the cream). I used roughly 3 ounces of meringues. Then, layer the meringue-cream and sliced strawberries in the serving dish of your choice. I used mason jars, my cousin used champagne flutes, it's really up to you. I think serving it in individual portions is nicer than making one communal bowl, and serving it in something translucent lets everyone see the layers of fruit and cream. Serve as soon after you assemble it as possible, otherwise the meringue will absorb the moisture from the cream and lose its crunch.

My crushed/sliced day-glo meringues. I couldn't find any white ones, but these tasted exactly like the plain variety and added some extra color.

Fresh strawberries, the perfect addition to whipped cream and meringue. 

Another view of the finished product. Bon Apetit! 

Monday, February 13, 2012

Thai Green Curry with Chicken and Coconut Rice

Thai Green Curry is definitely one of my favorite dishes to order out, and this is the first time that I've successfully made it at home. Today was cold and windy in Pacifica, so it seemed like the perfect day to make it. I consulted the curry paste section of a vegetarian cookbook, and the author recommended Thai Kitchen curry paste. I followed the instructions printed on the jar of curry paste, but deviated slightly by adding more coconut milk and vegetable stock (because I think the sauce is the best part and you can never have too much of it), and I used bell peppers, zucchini, and carrots in lieu of frozen peas. I think you can add just about any vegetable you like, I was trying to recreate the curry from my favorite Thai restaurant(s), Osha, and those are the vegetables they use.

Some of the ingredients I used: Unsweetened coconut milk, fish sauce, and green curry paste. 

This recipe requires quite a bit of chopping. I julienned two bell peppers, and sliced the carrot and zucchini on a bias to get long, thin slices. 

To accompany my Green Curry, I made coconut rice using Long Grain Jasmine Rice. 

I followed a recipe that I found on about.com which yields four servings of rice (or, in my opinion, closer to six). All you need to do is combine the following in a deep saucepan which you have coated with 1/2 teaspoon of vegetable oil. 
  • 2 cups of Jasmine rice
  • 2 cups of Unsweetened coconut milk
  • 1 3/4 cups of water
  • 1/4 teaspoon of salt
Bring the ingredients to a low bubble, stirring often to prevent the rice from sticking to the saucepan or burning. Then, reduce the heat to low, cover the saucepan, and leave to simmer for 15-20 minutes. You'll know the rice has finished cooking when almost all of the liquid has been absorbed. Then, turn off the heat, but leave the saucepan covered on the stove for an additional 5-10 minutes before serving.

The rice and the curry take roughly the same amount of time to cook. The recipe on the jar of curry paste recommends simmering the chicken and vegetables in the sauce for just 10 minutes before serving, but I let mine cook on a low heat for closer to 20 minutes to allow the carrots and zucchini to cook through. If you have any Thai basil leaves or cilantro, they would make a fantastic garnish for the dish. It was delicious, and the perfect remedy to a Winter's day.